Buy
Buy
When developing a web application in .NET Core, the middleware pipeline plays a crucial role in handling HTTP requests and responses. Understanding the correct order in which to arrange middleware components is essential for ensuring that your application functions as intended. The sequence of middleware dictates how requests are processed and how responses are generated, which can affect performance, security, and overall behavior. In this guide, we will explore the principles and best practices for organizing middleware in the .NET Core environment, helping you to create robust and efficient applications.

In ASP.NET Core, middleware plays a crucial role in request
processing pipelines, acting as a conduit through which HTTP requests flow
before reaching the destination.
By integrating a custom middleware class into your
application, you gain the flexibility to intercept, modify, or handle requests
and responses according to your specific requirements. This powerful feature
allows developers to inject custom logic at various stages of request
processing, thereby enhancing functionality, improving security, and optimizing
performance.
This introduction will guide you through the process of
implementing custom middleware in the Program.cs file of a .NET Core
application, showcasing practical examples and best practices.

Inherit the class with an interface IMiddleware and implement the interface’s methods.

·
Change the code of the method InvokeAsync
with the custom code
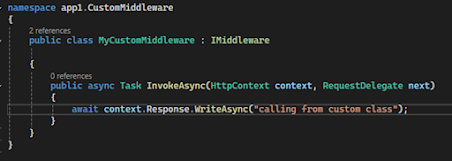
Note: The MyCustomMiddleware in
this example is inside a folder named ‘CustomMiddleWare’ hence the namespace is
showing as app1.CustomMiddleWare (my application name is app1)
·
Add the namespace in Program.cs
·
Add the custom middleware class using
AddTransient method just after the var builder line as shown below:

Note : the line of adding the custom middleware should be before the
builder.Build() command.
·
In order to call the custom middleware class,
add a line
app.UseMiddleware<MyCustomMiddleware>();
By incorporating custom middleware into your ASP.NET Core
application, you harness the power to tailor the request-handling pipeline to
your specific requirements. This enables you to inject custom logic, enhance
security measures, and optimize performance throughout the request-processing
flow.

The modular nature of
middleware promotes cleaner code and better maintainability, allowing for the
seamless addition of new functionality without disrupting existing components.
By understanding and utilizing custom middleware, developers can build more
robust, flexible, and efficient applications, ultimately delivering superior
user experience. Happy coding!
You may get into a situation where you have an existing SQL Server, and you want to build a code first DB approach using Entity Framework core.
You can use Scaffold-DbContext to create a model based on the existing database.
Below are the parameters that can be specified with Scaffold-DbContext in Package Manager Console:
Scaffold-DbContext [-Connection] [-Provider] [-OutputDir] [-Context] [-Schemas>] [-Tables>]
                    [-DataAnnotations] [-Force] [-Project] [-StartupProject] [<CommonParameters>]
In Visual Studio, select menu Tools --> NuGet Package Manger --> Package Manger Console and run the following command:
Scaffold-DbContext "Server=.\SQLExpress;Database=SchoolDB;Trusted_Connection=True;" Microsoft.EntityFrameworkCore.SqlServer -OutputDir Models
If you get an error like :
A connection was successfully established with the server, but then an error occurred during the login process. (provider: SSL Provider, error: 0 - The certificate chain was issued by an authority that is not trusted.
add attribute : TrustServerCertificate=True to the command. So your final command will look like:
Scaffold-DbContext "Server=servername\instaneName;Database=dbName;user id=userID;password=passwordValue;TrustServerCertificate=True" Microsoft.EntityFrameworkCore.SqlServer -OutputDir Models
Hi All,
While working with dot net core, if you encounter the following error:
Only the invariant culture is supported in globalization-invariant mode.
See https://aka.ms/GlobalizationInvariantMode for more information. (Parameter 'name')
en-us is an invalid culture identifier.
Here is the simple solution to resolve this:
1. Right click the dot net core project --> Select Edit Project File
2. In the XML file, file the node :
<InvariantGlobalization>true</InvariantGlobalization>
3. Replace 'true' with 'false'
The line should be :
<InvariantGlobalization>false</InvariantGlobalization>
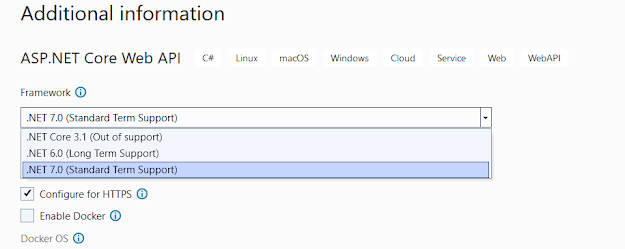
Have you faced an issue where .Net 8 version framework is not available to select while creating a new .Net core project?
Steps to check:


If you are creating the database using code first db approach using Entityframework Core and while creating the database using 'Update Database' command encounter the below error:
A connection was successfully established with the server, but then an error occurred during the login process. (provider: SSL Provider, error: 0 - The certificate chain was issued by an authority that is not trusted.)
Chances are there that there is an issue with the connection string mentioned in the web.config or appsettings.json (if using asp.net core app).
Compare the below before and after connection string :
OLD:
data source=YOUR_SERVER_NAME;initial catalog=YOUR_DB_NAME;integrated security=True;MultipleActiveResultSets=True;App=EntityFramework
NEW:
data source=YOUR_SERVER_NAME;initial catalog=YOUR_DB_NAME;integrated security=True;MultipleActiveResultSets=True;App=EntityFramework;Trusted_Connection=SSPI;Encrypt=false;
Add the above highlighted part at the end of the connection string and try to build the database.
It should work.
Cheers :)