Wednesday, July 29, 2009
Tuesday, July 21, 2009
How to send mail using CDO in VBScript
Today we will see how to send mail using CDO in VBScript. The same code can be used in ASP, VB also with small modification.
STEP 1: Define the constants:
Const cdoSendUsingMethod="http://schemas.microsoft.com/cdo/configuration/sendusing"
Const cdoSendUsingPort = 2
Const cdoSMTPServer ="http://schemas.microsoft.com/cdo/configuration/smtpserver"
Const cdoSMTPServerPort ="http://schemas.microsoft.com/cdo/configuration/smtpserverport"
Const cdoSMTPConnectionTimeout ="http://schemas.microsoft.com/cdo/configuration/smtpconnectiontimeout"
Const cdoSMTPAuthenticate = "http://schemas.microsoft.com/cdo/configuration/smtpauthenticate"
Const cdoBasic = 1
Const cdoSendUserName="http://schemas.microsoft.com/cdo/configuration/sendusername"
Const cdoSendPassword ="http://schemas.microsoft.com/cdo/configuration/sendpassword"
Const CdoReferenceTypeName = 1
STEP 2: Declare variables
Dim objConfig ' As CDO.Configuration
Dim objMessage ' As CDO.Message
Dim Fields ' As ADODB.Fields
Dim HtmlBody
STEP 3: Get a handle on the config object and it's fields
' Get a handle on the config object and it's fields
Set objConfig = CreateObject("CDO.Configuration")
Set Fields = objConfig.Fields
' Set config fields we care about
With Fields
.Item(cdoSendUsingMethod) = cdoSendUsingPort
.Item(cdoSMTPServer) = <SMTP-SERVER-NAME>
.Item(cdoSMTPServerPort) = <PORT-NUMBER>
.Item(cdoSMTPConnectionTimeout) = 10
.Item(cdoSMTPAuthenticate) = cdoBasic
.Item(cdoSendUsingMethod ) = 2
.Update
End With
STEP 4: Create instance CDO.Messsage object
Set objMessage = CreateObject("CDO.Message")
STEP 5: Add image to the mail body
Add this step only if you have an image to add to the body
Set objBP = objMessage.AddRelatedBodyPart("C:\Users\Varun.Sharma\Shell\1.jpg", "1.jpg", CdoReferenceTypeName)
objBP.Fields.Item("urn:schemas:mailheader:Content-ID") = "<1.jpg>"
objBP.Fields.Update
For description of step 5, visit: How to add image to mail body using CDO
STEP 6: assign the properties of CDO.Message object
Set objMessage.Configuration = objConfig
STEP 7: Build the HTML Body
Always prepare your html body before hand. That will help your code look better
HtmlBody="<img src=1.jpg><br>"
HtmlBody=HtmlBody & " Sending mail using CDO"
STEP 8: Set the CDO.Message mail properties
With objMessage
.To = To-Address
.Cc = CC-Address
.From = From-Address
.Subject = "SMTP Relay Test"
.HtmlBody=HtmlBody
.Send
End With
STEP 9: Release the CDO instances
Set Fields = Nothing
Set objMessage = Nothing
Set objConfig = Nothing
FULL CODE:
Const cdoSendUsingMethod ="http://schemas.microsoft.com/cdo/configuration/sendusing"
Const cdoSendUsingPort = 2
Const cdoSMTPServer ="http://schemas.microsoft.com/cdo/configuration/smtpserver"
Const cdoSMTPServerPort ="http://schemas.microsoft.com/cdo/configuration/smtpserverport"
Const cdoSMTPConnectionTimeout ="http://schemas.microsoft.com/cdo/configuration/smtpconnectiontimeout"
Const cdoSMTPAuthenticate ="http://schemas.microsoft.com/cdo/configuration/smtpauthenticate"
Const cdoBasic = 1
Const cdoSendUserName ="http://schemas.microsoft.com/cdo/configuration/sendusername"
Const cdoSendPassword ="http://schemas.microsoft.com/cdo/configuration/sendpassword"
Const CdoReferenceTypeName = 1
Dim objConfig ' As CDO.Configuration
Dim objMessage ' As CDO.Message
Dim Fields ' As ADODB.Fields
Dim HtmlBody
' Get a handle on the config object and it's fields
Set objConfig = CreateObject("CDO.Configuration")
Set Fields = objConfig.Fields
' Set config fields we care about
With Fields
.Item(cdoSendUsingMethod) = cdoSendUsingPort
.Item(cdoSMTPServer) = SMTP-SERVER-NAME
.Item(cdoSMTPServerPort) = PORT-NUMBER
.Item(cdoSMTPConnectionTimeout) = 10
.Item(cdoSMTPAuthenticate) = cdoBasic
.Item(cdoSendUsingMethod ) = 2
.Update
End With
Set objMessage = CreateObject("CDO.Message")
Set objBP = objMessage.AddRelatedBodyPart(PHYSICAL-PATH-OF-IMAGE, "1.jpg", CdoReferenceTypeName)
objBP.Fields.Item("urn:schemas:mailheader:Content-ID") = "<1.jpg>"
objBP.Fields.Update
Set objMessage.Configuration = objConfig
HtmlBody="<img src=1.jpg><br>"
HtmlBody=HtmlBody & "Testing the mail"
With objMessage
.To = TO-ADDRESS
.Cc = CC-ADDRESS
.From = FROM-ADDRESS
.Subject = "SMTP Relay Test"
'.TextBody = "SMTP Relay Test Sent @ " & Now()
.HtmlBody=HtmlBody
.Send
End With
Set Fields = Nothing
Set objMessage = Nothing
Set objConfig = Nothing
How to add image to mail body using CDO
Many times we face situation like, we need to send image in the html body of the mail that too using CDO.
Suppose we have an image at local server from where MailSend Code will get fire, here is the code:
Add this line of code to your CDO code to send image as a mail body:
Set objMessage = CreateObject("CDO.Message")
Set objBP = objMessage.AddRelatedBodyPart("C:\Users\Varun.Sharma\Shell\1.jpg", "1.jpg", CdoReferenceTypeName)
objBP.Fields.Item("urn:schemas:mailheader:Content-ID") = "<1.jpg>"
objBP.Fields.Update
Here, in AddRelatedBodyPart,
argument 1 is : physical location of image
argument 2 is : identifier of the image (any name)
argument 3 is : To tell CDO to send the image as well
In next line, just put image identifer to the right hand side.
When sending mail refer the image in html body like this:
mail.HtmlBody="<img src=1.jpg" >
For full code of sending mail using CDO, check the following link:
How to send mail using cdo in vbscript
Sunday, July 5, 2009
Learning UML with C#
UML is a simple diagramming style that was developed from work done by Grady Booch, James Rumbaugh, and Ivar Jacobson, which resulted in a merging of ideas into a single specification and, eventually, a standard.
Here , We will see how to map a class and its relation in UML.
Basic UML diagrams consist of boxes representing classes. Let’s consider
the following class (which has very little actual function).
Basic Class :
public class Person {
private string name;
private int age;
//-----
public Person(string nm, int ag) {
name = nm;
age = ag;
}
public string makeJob() {
return "hired";
}
public int getAge() {
return age;
}
public void splitNames() {
}
}
We can represent this class in UML, as shown in Figure
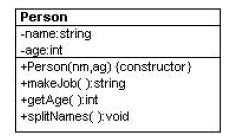
The top part of the box contains the class name and package name (if any).
The second compartment lists the class’s variables, and the bottom compartment lists its methods. The symbols in front of the names indicate that member's visibility, where "+" means public, "-" means private, and "#" means protected. Static methods are shown underlined.
Abstract methods may be shown in italics or in an “{abstract}” label.
UML does not require that you show all of the attributes of a class, and it
is usual only to show the ones of interest to the discussion at hand.
Inheritance:
Now, we will look into inheritance and how to implement it in UML.
Let’s consider a version of Person that has public, protected, and private variables and methods, and an Emplo yee class derived from it.
public abstract class Person {
protected string name;
private int age;
//-----
public Person(string nm, int ag) {
name = nm;
age = ag;
}
public string makeJob() {
return "hired";
}
public int getAge() {
return age;
}
public void splitNames() {
}
public abstract string getJob(); //must override
}
We now derive the Employee class from it, and fill in some code for the getJob method.
public class Employee : Person {
public Employee(string nm, int ag):base(nm, ag){
}
public override string getJob() {
return "Worker";
}
}
You represent inheritance using a solid line and a hollow triangular arrow.
For the simple Employee class that is a subclass of Person, we represent this in UML, as shown in Figure
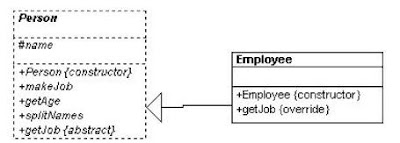
Note that the name of the Employee class is not in italics because it is now a concrete class and because it includes a concrete method for the formerly abstract getJob method.
Subscribe to:
Posts (Atom)