This blog is dedicated to new technologies of Microsoft, including LINQ, sharepoint, ADO.NET entity framework and lot more
add
Thursday, February 5, 2026
Tuesday, January 27, 2026
Learn Programming Fundamentals
A lot of developers and students tell me the same thing:
“I watch tutorials… but my fundamentals are still weak.”
That’s why I’ve started building something new.
I’m creating short, simple content on:
- OOP & clean code
- Design principles (SOLID, architecture)
- How things actually work under the hood
No hype. No shortcuts. Just fundamentals that make you a better engineer.
I’m sharing this on Instagram and YouTube so people can learn in small daily doses.
If you believe strong fundamentals create strong careers,
you’re welcome to join me here 👇
▶️ YouTube:
https://www.youtube.com/@FundamentallyClean
📸 Instagram:
https://www.instagram.com/fundamentallyclean/
Saturday, January 10, 2026
Revisiting OOPS : 30 Days Fundamental Series
Learn OOPS the Right Way
- core OOPS concepts
- real-world analogies
- common beginner mistakes
- clean design thinking
Wednesday, January 8, 2025
Proper order is adding middleware in dot net core application
Introduction
When developing a web application in .NET Core, the middleware pipeline plays a crucial role in handling HTTP requests and responses. Understanding the correct order in which to arrange middleware components is essential for ensuring that your application functions as intended. The sequence of middleware dictates how requests are processed and how responses are generated, which can affect performance, security, and overall behavior. In this guide, we will explore the principles and best practices for organizing middleware in the .NET Core environment, helping you to create robust and efficient applications.
Tuesday, January 7, 2025
Adding custom middleware in Dot Net Core application
Introduction
In ASP.NET Core, middleware plays a crucial role in request
processing pipelines, acting as a conduit through which HTTP requests flow
before reaching the destination.
By integrating a custom middleware class into your
application, you gain the flexibility to intercept, modify, or handle requests
and responses according to your specific requirements. This powerful feature
allows developers to inject custom logic at various stages of request
processing, thereby enhancing functionality, improving security, and optimizing
performance.
This introduction will guide you through the process of
implementing custom middleware in the Program.cs file of a .NET Core
application, showcasing practical examples and best practices.
Steps of adding the custom middleware
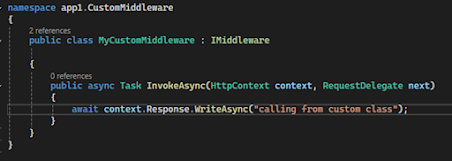
Create a Custom Middleware Class:
- Create
a new class file, for example MyCustomMiddleware.cs.
Inherit the class with an interface IMiddleware and implement the interface’s methods.
·
Change the code of the method InvokeAsync
with the custom code
Note: The MyCustomMiddleware in
this example is inside a folder named ‘CustomMiddleWare’ hence the namespace is
showing as app1.CustomMiddleWare (my application name is app1)
Adding the custom middleware in the pipeline:
·
Add the namespace in Program.cs
·
Add the custom middleware class using
AddTransient method just after the var builder line as shown below:
Note : the line of adding the custom middleware should be before the
builder.Build() command.
·
In order to call the custom middleware class,
add a line
app.UseMiddleware<MyCustomMiddleware>();
Conclusion
By incorporating custom middleware into your ASP.NET Core
application, you harness the power to tailor the request-handling pipeline to
your specific requirements. This enables you to inject custom logic, enhance
security measures, and optimize performance throughout the request-processing
flow.
The modular nature of
middleware promotes cleaner code and better maintainability, allowing for the
seamless addition of new functionality without disrupting existing components.
By understanding and utilizing custom middleware, developers can build more
robust, flexible, and efficient applications, ultimately delivering superior
user experience. Happy coding!
Saturday, February 24, 2024
How to generate table Model class from SQL Server using EntityFramework Core
You may get into a situation where you have an existing SQL Server, and you want to build a code first DB approach using Entity Framework core.
You can use Scaffold-DbContext to create a model based on the existing database.
Below are the parameters that can be specified with Scaffold-DbContext in Package Manager Console:
Scaffold-DbContext [-Connection] [-Provider] [-OutputDir] [-Context] [-Schemas>] [-Tables>]
[-DataAnnotations] [-Force] [-Project] [-StartupProject] [<CommonParameters>]
In Visual Studio, select menu Tools --> NuGet Package Manger --> Package Manger Console and run the following command:
Scaffold-DbContext "Server=.\SQLExpress;Database=SchoolDB;Trusted_Connection=True;" Microsoft.EntityFrameworkCore.SqlServer -OutputDir Models
If you get an error like :
A connection was successfully established with the server, but then an error occurred during the login process. (provider: SSL Provider, error: 0 - The certificate chain was issued by an authority that is not trusted.
add attribute : TrustServerCertificate=True to the command. So your final command will look like:
Scaffold-DbContext "Server=servername\instaneName;Database=dbName;user id=userID;password=passwordValue;TrustServerCertificate=True" Microsoft.EntityFrameworkCore.SqlServer -OutputDir Models
Saturday, September 16, 2023
ERROR : Only the invariant culture is supported in globalization-invariant mode.
Hi All,
While working with dot net core, if you encounter the following error:
Only the invariant culture is supported in globalization-invariant mode.
See https://aka.ms/GlobalizationInvariantMode for more information. (Parameter 'name')
en-us is an invalid culture identifier.
Here is the simple solution to resolve this:
1. Right click the dot net core project --> Select Edit Project File
2. In the XML file, file the node :
<InvariantGlobalization>true</InvariantGlobalization>
3. Replace 'true' with 'false'
The line should be :
<InvariantGlobalization>false</InvariantGlobalization>
Friday, September 15, 2023
.NET 8 preview not showing in Visual Studio 2022
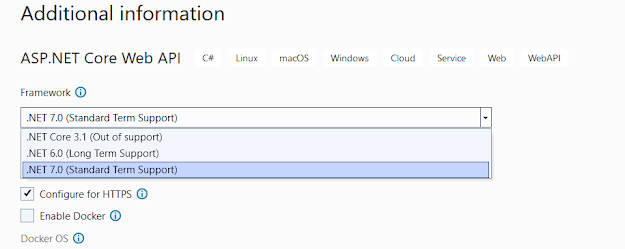
Have you faced an issue where .Net 8 version framework is not available to select while creating a new .Net core project?
Steps to check:
- Check whether you have installed the latest preview of Visual Studio 2022 (17.7).
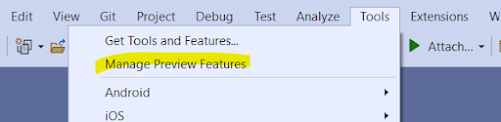
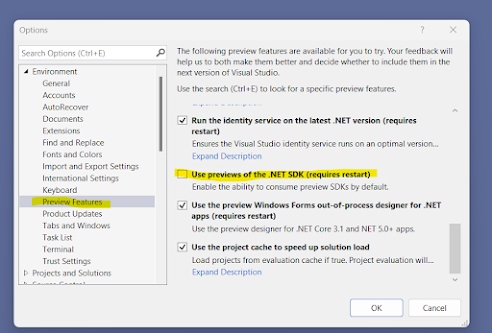
- Enable Preview feature usage:
Thursday, September 14, 2023
A connection was successfully established with the server, but then an error occurred during the login process.
If you are creating the database using code first db approach using Entityframework Core and while creating the database using 'Update Database' command encounter the below error:
A connection was successfully established with the server, but then an error occurred during the login process. (provider: SSL Provider, error: 0 - The certificate chain was issued by an authority that is not trusted.)
Chances are there that there is an issue with the connection string mentioned in the web.config or appsettings.json (if using asp.net core app).
Compare the below before and after connection string :
OLD:
data source=YOUR_SERVER_NAME;initial catalog=YOUR_DB_NAME;integrated security=True;MultipleActiveResultSets=True;App=EntityFramework
NEW:
data source=YOUR_SERVER_NAME;initial catalog=YOUR_DB_NAME;integrated security=True;MultipleActiveResultSets=True;App=EntityFramework;Trusted_Connection=SSPI;Encrypt=false;
Add the above highlighted part at the end of the connection string and try to build the database.
It should work.
Cheers :)
Tuesday, November 1, 2011
Convert DATETIME TO TIMESPAN IN C#
Convert TimeSpan To DateTime in c# + One line Code
Here is how it can be done easily just by casting:
Suppose we have two variables DateTime and Timespan and Timespan one with some value
DateTime dt;
TimeSpan ts="XXX";
We can covnert 'ts' to 'dt' like this:
dt= Convert.ToDateTime(ts.ToString());
Thats it!!!
Hope you have liked the solution.
Varun
Tuesday, February 2, 2010
Microsoft Access was unable to create the .accde, .mde or .ade file
Many times we have faced issue that after creating the MDB file, when we try to compile the database to MDE file ,Access gives the following error :
Microsoft Access was unable to create the .accde, .mde or .ade file
On clicking the button 'Show Help', it shows following error message:
This error is usually associated with compiling a large database into an MDE file. Because of the method used to compile the database, a considerable number of TableID references are created for each table. The Access database engine can only create a maximum of 2048 open TableIDs at one time. Exporting a database as an MDE potentially can exceed this limit if the database has a large number of objects (table, macro, form, report, etc).
There is no accurate method to estimate the number of TableIDs the Access database engine uses during the process of compiling a database as an MDE. However, each VBA module and each form uses one TableID, as a result, if the database has 500 forms, and each form's HasModule property is set to Yes, as many as 1,000 TableIDs are used.
Solution:
The main reason of database not getting compiled to mde is that it failed during compilation. That is , yiu have some code tha failed to compile.
Steps:
1. Press Alt + F11 to display VBA editor.
2. In the menu 'Debug' , you will find 1st menu item as 'Compile AccessDb'.
3. Click that option.
4. If there is no error, the database will get compiled.
5. If during compilation, any error is encountered, the VBA editor will display that error and you can rectify that.
6. Once all errors get rectified, you will be able to compile the database.
Once successfully compiled, try making the mde again ans it will definitely make the mde file.
Wednesday, December 23, 2009
How to reset the autoincrement field in MS Access Table
Many times we use autoicrement field in Ms Access table and we have noticed that the value of autoincrement field keeps on increasing ever if we delete all the rows of the table and add new row.
In order to reset the autoincrement field value back to 1, do the following:
1. Delete all the rows from the table.
2. Compact the whole database .
This will automatically reset the autoincrement value back to 1.
Tuesday, December 22, 2009
Introducing WCF 3.5
This post will cover few fundamental topics like:
• What is Windows Communication Foundation?
• Advantage of WCF
• What is an endpoint?
• Structure of endpoint or ABC of an end point.
• Explaining Address
• Explaining Binding and type of binding
• How to select proper binding
• Contracts and type of contracts
• Discussing Service Contract in detail।
What is WCF?
WCF stands for Windows Communication Foundation and comes along with Dot net framework 3.0 onwards and as a part of operating system from Vista onwards.
Business process in today’s market depends on various systems based on systems that runs on different platform within or outside an organization. There must be a way , a solution to have a communication between these various systems.
Why to use WCF?
WCF basically is a Microsoft’s solution to develop communication between distributed application। One may think why to use WCF when we already have lot of options to develop distributed application in past. The one line answer is that WCF acts as an unified technology that encapsulates all existing technologies to develop distributed application such as .NET Remoting, ASMX, MSMQ etc.
Apart from that we get lot of option on how to host the WCF service like IIS, or Widows Activated Service (WAS) etc. That we will discuss in later post.
I am eliminating discussion on history of distributed application since distributed application development is such a huge topic that it will divert our objective to learn WCF basics , However, throughout the document, I will map the similarity between existing distributed application solution to WCF।
Endpoint is the part that a service exposes to the outer system. It defines various details of a service hosted. The consumer reads the endpoint to judge the nature, type of the hosted service.
The ABC of WCF Endpoint:
Three basic component of any WCF service is :
“A” is for Address: Where to find the service
“B” is for Binding: How to communicate with the service
“C” is for Contract: What to send to the service or what to expect from the service.
Address:
It defines where on the network messages should be sent so that the endpoint receives them. This is the location to which messages must be sent by the client.
The address for an endpoint is a unique Uniform Resource Locator (URL) that identifies the location of the service. The address should follow the Web Service Addressing (WS-Addressing) standard, which means it might contain the following four parts:
• Scheme: The top-level portion of the address, this is typically “http” followed by a colon.
This is not the same thing as a protocol, even though it commonly uses the same letters as the protocol.
• Machine: Identifies the machine name, which can be a public URL or a local identifier.
• Port: The optional port number, preceded by a colon.
• Path: The path used to locate the service files. Typically, this is just the service name, but the path
Syntax of an address will be: Scheme://Machine[:Port]/Path1/Path2
Examples:
http://localhost:8080/Service1
http://localhost/Service1/SubService
http://www.ServiceHost.com/Service1
net.tcp://localhost:1234/OrderService
WCF supports several protocols, and each has its own particular addressing format.
1. HTTP protocol:
HTTP services can be either self-hosted or hosted on Internet Information Services (IIS). When addressing an HTTP service in a self-hosted scenario, you use the following format:
http://localhost:8080/QuickReturns/Exchange
2. TCP Protocol:
The TCP transport uses the net.tcp: scheme but otherwise follows the same rules as described
for HTTP addresses. Here is an example:
net.tcp://localhost:8080/QuickReturns/Exchange
3. MSMQ:
You can use the Microsoft Message Queue (MSMQ) transport in an asynchronous one-way
(fire-and-forget) or duplex type of messaging pattern and use the MSMQ features of Windows. net.msmq://localhost/private$/QuickReturnSettleTrade
4. Named Pipes:
It is a common way to provide a means to implement inter- or in-process communication.
The Named Pipes transport in WCF supports only local communication and uses the
net.pipes scheme. Port numbers don’t have any meaning with the Named Pipes transport.
This results in the following address format:
net।pipe://localhost/QuickReturns/Exchange
Binding:
A binding defines how you can communicate with the service. It is the primary extension point of the ABCs of WCF. The binding controls the following:
• The transport (HTTP, MSMQ, Named Pipes, TCP)
• The channels (one-way, duplex, request-reply)
• The encoding (XML, binary, MTOM…)
• The supported WS-* protocols (WS-Security, WS-Federation, WS-Reliability, WS-Transactions)
WCF provides a default set of bindings that should cover most of your requirements. If the default bindings don’t cover your requirements, you can build your own binding by extending from CustomBinding.
There are nine preconfigured bindings in WCF. Each of these provides the means for a particular distributed computing need. There are several factors that determine which binding to choose for a specific application, including security, interoperability, reliability, performance, and transaction requirements.
Table below compares the nine preconfigured bindings by showing the common features they support. This table can be used to select a best binding for a particular need.
Below is the process that will help you to select the binding you required for your application:

Contract:
A contract is a description of the messages that are passed to and from service endpoints.
There are three types of contracts in WCF:
• Service contracts : Service contracts describe the functional operations implemented by the service. A service contract maps the class methods of a .NET type to WSDL services, port types, and operations. Operation contracts within service contracts describe the service operations, which are the methods that implement functions of the service.
• Data contracts: Data contracts describe data structures that are used by the service to communicate with clients. A data contract maps CLR types to XML Schema Definitions (XSD) and defines how they are serialized and deserialized. Data contracts describe all the data that is sent to or from service operations.
• Message contracts: Message contracts map CLR types to SOAP messages and describe the format of the SOAP messages and affect the WSDL and XSD definitions of those messages. Message contracts provide precise control over the SOAP headers and bodies.
We will cover each type of binding and contract as we moves ahead with the implantation of WCF service. All theory will really make all of confuse so we need a bit of coding also..
Explaining Service Contract:
NOTE: before going into code, I would like to mention that all class, attributes specified to WCF comes from System.ServiceModel namespace. So import this namespace before going for coding.
A service contract is a collective mechanism by which a service capabilities and requirements are specified for its consumers.
Few points regarding Service Contract:
• A service contract can be applied to a normal dot net class or an interface.
• Service contract attribute is not inherited. That means if you are inheriting a class that has service contract attribute to it, you need to define the attribute to the derived class also. It will not get inherited automatically.
• Best practice is to use service contract attribute to interface.
• Always use namespace and Name parameter when defining a service contract attribute.
Sample Code:
An interface defined as a service contract without any parameter.
[ServiceContract()]
public interface ITaskManagerService
{ …. }
An interface defined as a service contract without any parameter.
[ServiceContract(Name=”ServiceName”,Namespace=”http://schema.application.com/path1”)]
public interface ITaskManagerService
{ …। }
Explaining Operation Conntract:
The OperationContractAttribute, also defined in the System.ServiceModel namespace, can be applied only to methods. It is used to declare the method as belonging to a Service contract.
[ServiceContract(Name=”ServiceName”,Namespace=”http://schema.application.com/path1”)]
public interface ITaskManagerService
{
[OperationContract(IsOneWay = true,name=”Operation1”)]
void ProcessInsertMessage(Message message);
}
So the above piece of code displays a interface defined as a service contract and its method as an operation contract।
In next article, I will discuss Message Exchange Pattern and two other contracts that is Data Contract and Message Contract.
Wednesday, November 18, 2009
All about Global.asax
Your ASP.NET applications can have only a single Global.asax file. This file supports a number of items.
When it is created, you are given the following template:
<%@ Application Language="VB" %>
<script runat="server">
Sub Application_Start(ByVal sender As Object, ByVal e As EventArgs)
' Code that runs on application startup
End Sub
Sub Application_End(ByVal sender As Object, ByVal e As EventArgs)
' Code that runs on application shutdown
End Sub
Sub Application_Error(ByVal sender As Object, ByVal e As EventArgs)
' Code that runs when an unhandled error occurs
End Sub
Sub Session_Start(ByVal sender As Object, ByVal e As EventArgs)
' Code that runs when a new session is started
End Sub
Sub Session_End(ByVal sender As Object, ByVal e As EventArgs)
' Code that runs when a session ends.
' Note: The Session_End event is raised only when the sessionstate mode
' is set to InProc in the Web.config file. If session mode is
' set to StateServer
' or SQLServer, the event is not raised.
End Sub
</script>
Just as you can work with page-level events in your .aspx pages, you can work with overall application
events from the Global.asax file.
In addition to the events listed in this code example, the following list
details some of the events you can structure inside this file:
- Application_Start: Called when the application receives its very first request. It is an ideal spot in your application to assign any application-level variables or state that must be maintained across all users.
- Session_Start: Similar to the Application_Start event except that this event is fired when an individual user accesses the application for the first time. For instance, the Application_Start event fires once when the first request comes in, which gets the application going, but the Session_Start is invoked for each end user who requests something from the application for the first time.
- Application_BeginRequest: Although it not listed in the preceding template provided by Visual Studio 2008, the Application_BeginRequest event is triggered before each and every request that comes its way. This means that when a request comes into the server, before this request is processed, the Application_BeginRequest is triggered and dealt with before any processing of the request occurs.
- Application_AuthenticateRequest: Triggered for each request and enables you to set up custom authentications for a request.
- Application_Error: Triggered when an error is thrown anywhere in the application by any user of the application. This is an ideal spot to provide application-wide error handling or an event recording the errors to the server’s event logs.
- Session_End: When running in InProc mode, this event is triggered when an end user leaves the application.
- Application_End: Triggered when the application comes to an end. This is an event that most ASP.NET developers won’t use that often because ASP.NET does such a good job of closing and cleaning up any objects that are left around.
In addition to the global application events that the Global.asax file provides access to, you can also use directives in this file as you can with other ASP.NET pages. The Global.asax file allows for the following directives:
- @Application
- @Assembly
- @Import
These directives perform in the same way when they are used with other ASP.NET page types.
How to place two classes written in different languages in App_Code
The \App_Code folder is meant to store your classes, .wsdl files, and typed datasets. Any of these items stored in this folder are then automatically available to all the pages within your solution.
Everything placed in the \App_Code folder is compiled into a single assembly. The class files placed within the \App_Code folder are not required to use a specific language. This means that even if all the pages of the solution are written in Visual Basic 2008, the class in the \App_Code folder of the solution can be built in C#.
Here is a small catch...
Because all the classes contained in this folder are built into a single assembly, you cannot have classes of different languages sitting in the root \App_Code folder, as in the following example:
\App_Code
Class1.cs
Class2.vb
Having two classes made up of different languages in the \App_Code folder causes an
error to be thrown. It is impossible for the assigned compiler to work with two different languages.
Therefore, in order to be able to work with multiple languages in your \App_Code folder, you must make some changes to the folder structure and to the web.config file.
The first step is to add two new subfolders to the \App_Code folder
— a \VB folder and a \CS folder.
This gives you the following folder structure:
\App_Code
\VB
\CS
This still will not correctly compile these class files into separate assemblies, at least not until you make some additions to the web.config file.
In the web.config file , change the <compilation>
node so that it is structured as following:
<compilation>
<codeSubDirectories>
<add directoryName="VB"></add>
<add directoryName="CS"></add>
</codeSubDirectories>
</compilation>
Now that this is in place in your web.config file, you can work with each of the classes in your ASP.NET pages. In addition, any C# class placed in the CS folder is now automatically compiled just like any of the classes placed in the VB folder.
NOTE: The name of sub directories are'VB' and 'CS' for this example. You can put any name you wish to.
Tuesday, November 10, 2009
SharePoint Server 2010 Preliminary System Requirements
Sharepoint Server 2010 is on its way and it is high time to get ourself familiar with the system requirement of SharePoint Server 2010..
- SharePoint Server 2010 will be 64 bit only.
- SharePoint Server 2010 requires 64 bit Windows Server 2008 (R2)
- SharePoint Server 2010 requires 64 bit SQL Server 2005 or 2008
- SharePoint Server 2010 will support only IE7, IE8 and Firefox 3.x on Windows OS.
- IE6 will not be supported by SharePoint Server 2010
The reason SharePoint platform is upgrading to 64 bit is to utilize the full power of extra bits while using 64 bit bus.
SharePoint performance and scalability can benefit significantly from 64-bit SQL Server and the throughput increases are significant enough for us to make the difficult decision to only support SharePoint Server 2010 on 64-bit SQL Server 2005 or 2008. It has been our strong recommendation for some time that SharePoint Server 2007 customers take advantage of 64-bit SQL Server due to the inherent performance and scale benefits it can provide.
Look out for the space for more news on SharePoint Server 2010.....
Varun
Tuesday, September 8, 2009
How to disconnect a map drive using vbscript
In this post, I will demonstrate how to disconnect from an existing connected network drive.
Suppose we have a drive Z: that is a network drive connected. Following is the code regarding how ti remove it.
Option Explicit
Dim WshNetwork, ShareName
Set WshNetwork = WScript.CreateObject("WScript.Network")
ShareName = "Z:"
WshNetwork.RemoveNetworkDrive ShareName, true, true
WScript.Quit
We are creating an object of WScript.Network and calling method RemoveNetworkDrive by passing the drive letter.
How to map network drive using VBScript
Today I will demonstate how to connet and then disconnect from a network drive.
In order to connect to a network drive, we need following data/information:
1. HomeServer Location: Actual path of the drive. In our example it is
"\\125.99.218.158\Data"
2. Name of the drive you wish to give: Let us say Z:
3. UserId/Password using which we will connect the map drive. If userid is same as logged in user then it is not required.
We will create an object of WScript.Network and call its method MapNetworkDrive
Here is the code:
Option Explicit
Dim strUser, strPassword, strDriveLetter, strHomeServer, strProfile
Dim objNetwork
Set objNetwork = CreateObject("WScript.Network")
strDriveLetter = "Z:"
strHomeServer = "\\125.99.218.158\Data"
strProfile = "False" ' Mapping (not) stored in user Profile
strUser = "USERID"
strPassword = "PASSWORD"
objNetwork.MapNetworkDrive strDriveLetter,strHomeServer,strProfile,strUser,strPassword
WScript.Quit
So the above code is creating an object of Wscript.Network and calling method MapNetworkDrive by passwing parameters like drive letter, hom server, userid and password.
There is one more parameter that is strProfile. If set true, it will store the drive info in user profile and it will connect automatically next time when user logs in.